Wednesday, December 26, 2012

Reindeer Mix

The past few weeks have just been a whirl wind! I just don't know where these past two weeks have gone. I was so looking forward to Christmas and having some time off, just hanging with the family and poof! Christmas is done! Everyone, but me, is back to work.

I'm feeling a little bored today because of it. I said good bye to my son as he headed back to his place in Mankato. He had to work the day after Christmas. Seems he just got here and he had to leave. He won't be back until I'm already back at work.

My husband had to get up this morning and work. He'll be working the rest of the week. I'm not use to that. He use to get off at this time of year, but now with the place he works this is not the case.

My daughter is getting ready to go in to work here in a bit. She, however, is almost done working until she comes back from her study abroad for school.

Well I decided that I'll have to keep myself busy with some quilting and some cooking. I'm trying to finish up a quilt I've been working on for some time now and I'm trying to figure out what to make for dinner.

I did want to share with everyone my recipe for Reindeer mix. This snack mix you could really eat anytime of year. We just always choose to make it at Christmas time. In fact it was one of those things that my son was really looking forward to us having when he came home for the holidays.

I originally got the recipe from the Taste of Home, but I have changed it slightly to fit the tastes of my family members. So it has evolved over the years. I would suggest just doubling the batch, because it will go quickly. We always double it and I always have to make another double batch.

Reindeer Mix


Reindeer Mix
2 C Fritos
2 C Cheese Flavored snack crackers
2 C Pretzel sticks
2 C Corn Chex
2 C Bite size Shredded Wheat
1 C Pecan halves

1/2 C Butter, melted
1 T Maple syrup
1 1/2 t Worcestershire sauce
3/4 t Cajun seasoning
1/4 t cayenne pepper 

In a large bowl, combine the  first six ingredients. In another bowl, combine the butter, syrup, Worcestershire sauce, Cajun seasoning and cayenne; pour over cereal mixture and toss to coat. Transfer to an ungreased roasting pan. Bake, uncovered, at 250 for 1 hour; stirring every 15 minutes.

Wednesday, December 5, 2012

Spritz Cookies

Today I am in need of some baking. Things are a bit stressful in my life right now and one way I know of curing it is to bake something sweet.

Since it's the holiday season I decide I would try my hand at making some spritz cookies. Now I haven't made these in years and if I remember right it was a bit difficult working that dumb cookie press.

These cookies bring back memories of when my daughter was a little baby, not quite one, and she was sitting in her high chair eating spritz cookies. I was busy decorating the tree when I heard my baby's first word.... "more". So precious! I was so excited to finally hear her talk I of course gave her more cookies. 

I have purchased a new cookie press since my last attempt at making these cookies and I was hoping that this new Cuisinart Electric Cookie Press was going to work like a charm. Well much to my surprise it worked great.Super Easy!!!

I only made 1/2of the recipe this time. I didn't know how the press would work and I am short on time tonight, but I now know that I'll be making some more of these before Christmas.

The recipe is from my mom. She's been making them since I was a little girl and I'm not sure where she got the recipe. The recipe does state to add vanilla to taste. I added 2 teaspoons to this batch, but I could probably added more. So here's the recipe. I hope you enjoy them!


Spritz Cookies
1-lb butter
1 C granulated sugar
2 eggs
2 extra yolks
4 1/2 C sifted flour
vanilla to taste
Mix butter, sugar, eggs & yolks together with a mixer. Add vanilla. Slowly add the flour mixing with your mixer. Put dough in the cookie press and press cookies onto ungreased cookie sheets, sprinkle with colored sugar. Bake at 350 for 5-6 minutes. Cool slightly and remove from pans.


Wednesday, November 21, 2012

Sweet Potato Casserole

Here it is! My highly coveted recipe for sweet potatoes. I don't usually share this recipe with people, but it is so good and my family requests this dish every holiday. My husband was so sweet and told me that I make the best sweet potatoes and that my cooking doesn't get the credit that it should from family members.

Now he's not talking about my children. He's talking about siblings and such. I don't mind though. I just figure they are jealous that they can't cook as well as me. Funny thing is I got the recipe from my sister in law and I just tweaked a little to make it a little easier to prepare. Now everyone raves about her dish, but never about mine.

So I decided to share my recipe for my highly requested sweet potatoes. I'm sure you'll love them too. You can make these a few days in advance of your dinner. Just keep it covered and refrigerated.
Sweet Potato Casserole before baking.


Sweet Potato Casserole
7-8 sweet potatoes
1/4 t salt
1/4 + 2 T butter
3 eggs
1 1/2 t vanilla
3/4 t cinnamon
3/4 C sugar
3 T half and half or milk
1/4 + 2 T soften butter
1/4 C + 1 t brown sugar
3/4 C pecans, chopped

Peel sweet potatoes and boil until potatoes are done. Drain the potatoes and  mash them in the kettle. Add the salt, butter, eggs, vanilla, cinnamon, sugar and half and half. Mix well. Transfer mixture to a 9 X 13 pan. In a medium bowl combine softened butter, brown sugar and pecans. Mix with fingers to a course meal and sprinkle on top. You may cover and store in the fridge until ready to bake. Bake 35 minutes until topping is crisp. and lightly brown.

Tuesday, November 20, 2012

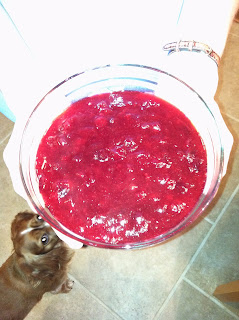
Cranberry Sauce

Well I've spent the last few hours listening to Christmas music blasting on the radio in the kitchen and prepping dishes for Thanksgiving dinner. This is my favorite holiday! I love the food and I love the mood of getting ready for Christmas.

I actually have quite a few dishes that I make ahead of time, but this year I wanted to try something new. I've always wanted to try and make cranberry sauce, but I was afraid that it would turn out soupy or taste sour. I love cranberry sauce and I didn't want to wreck that perfection that I've had in my head for years.

After searching online for a recipe I kind of came up with my own recipe. I was a little nervous about trying this, so I made sure I had a can of cranberries in the cupboard as back up and then I went for it.

So after much anticipation I am happy to say my cranberry sauce turned out to be very good! It was so easy to make that I don't know why I have never tried it before. This recipe is for  sure a keeper and I'm going to make some more for Christmas. It'll be the perfect side dish with the turkey on Thursday.

Give this one a try and I'm sure you'll agree that it is a keeper!
Cranberry Sauce


Cranberry Sauce
1- 12 ounce package of cranberries
1 C of cranberry juice
1 C sugar
3 T lemon juice

Rinse cranberries and then put in a 2 quart sauce pan. Add juice, sugar and lemon juice. Bring mixture to a boil. Stir constantly. Boil for 3-4 minutes then reduce heat to medium heat. Cook for another 10 minutes. Mixture will start to gel as you cook. Cool sauce in a cover container. Mixture can be made a few days in advance.

Wednesday, November 7, 2012

Peanut Butter Cookies


Today was just one of those days that I just wished I could have had the day off. Not that I don't like my job it's just that I have been going strong since mid August and I really need a break.

 I am also really starting to feel the pressure as the end of the trimester approaches. So many assessments that need to be finished and only 14 days to do it in. Yikes!

Needless to say I am really need some stress relieving food right now. Usually I would opt for chocolate, but I'm just not in the mood for that.

What I am in the mood for is peanut butter. So I decided to make some peanut butter cookies. This recipe is one that my mom use to make when I was a kid. I have no idea where it came from. All I know is it is one of the best peanut butter cookies that I have tried.

It tastes best when you use a real good brand name peanut butter, but I don't have any in the house right now so I'm going with a cheaper brand.

I'm sure these cookies will help chase away my blues and give me that positive outlook that I need to get these darn assessments done! Be gone dumb assessments! Be gone stress!

Peanut Butter Cookies


Peanut Butter Cookies
3 C flour
2 t soda
1/4 t salt
1 C shortening
1 C sugar
1 C brown sugar
2 eggs, beaten
1 C peanut butter
1 t vanilla

Mix the first three ingredients together and set aside. Mix the next seven ingredients together. Add the dry ingredients to the wet ingredients and mix well. Form into tiny balls and press on a greased cookie sheet with a fork. Bake at 375 for 15-18 minutes.

Friday, October 19, 2012

Pumpkin Donuts

Today has been such a lazy day. After three days of conferences at school I was really ready for some down time. It felt so good to lounge in my pj's this morning until 11:00. I don't get to do that very often.

The next couple of days are Education Minnesota Conference days. Days when I should go and check out some new teaching tips.  I was going to go today, but I needed to get my oil changed in my van and have a funky noise checked out, so I decide it was best to take the 3:00 appointment today.

Since I had vast amounts of time today I decided to try out a new recipe. The weather is wet and cold out and feeling very fall like. I also have pumpkins on my mind so I decide to try and make some pumpkin donuts.

I have already invested in the donut pans from Wilton and I've tried doing this before, but the donuts were only ok. This time I attempted to make pumpkin donuts. I didn't think I could go wrong with this flavor and I was right. These donuts are super good. It is hard to eat just one.

You could use this batter and simply make muffins if you want. You would have to bake them a little longer, but if you have these donut pans I say go for it.

After baking these donuts you can shake them in a sugar mixture, frost them or simply eat them plain. They are good no matter what you do.

If you are going to buy these pans I would suggest waiting until Michaels has a 50% off coupon on bakeware. They tend to have these coupons often and I don't know if it is worth paying full price for a specialty pan that you might not use a lot. That's what I do on all my bakeware pans for cake decorating and such.

Give this recipe a try whether you want to do donuts or muffins they taste great and make the house smell wonderful!

Pumpkin donuts

 Preheat oven to 350 and spray donut pans with cooking spray.

Place the following in a mixing bowl:
1/2 cup vegetable oil
3 large eggs
1 1/2 cups granulated sugar
1 1/2 cups canned pumpkin
1 1/2 teaspoons pumpkin pie spice, or 3/4 teaspoon ground cinnamon plus a heaping 1/4 teaspoon each ground nutmeg and ground ginger
1 1/2 teaspoons salt
1 1/2 teaspoons baking powder
Beat everything together until smooth.

Add 1 3/4 cups + 2 tablespoons (8 ounces) flour, stirring just until smooth.

Fill donut pans about 1/2 full with batter and bake 15 minutes. Cool in pan 5 minutes before removing and cool on a rack. While still slightly warm shake in a sugar,cinnamon, ginger, nutmeg mixture. 


Tuesday, October 16, 2012

Tomato Basil Parmesan Soup

Well we've had some really nice fall days here lately, but the weather is about to change starting tomorrow. From what I hear the temps are going to be very chilly and that is not appealing to me at all. I've really enjoyed sitting outside with a little fire on these cool evenings, but I fear these nice nights will be gone for a while and I'll have to be happy with sitting by the wood burning stove inside keeping warm in my family room.
Cozy fire on my front patio.


Well another way to keep warm is having a nice warm bowl of soup at dinner time. I found this amazing recipe for Tomato Basil Parmesan soup. The recipe originally was to be made in the crock pot, but when I found the recipe it was about three in the afternoon and I did not have the time to throw it all and the crock pot and let it cook. So I decide to make it on the stove top and it turned out great. My husband and I ended up taking our soup outside by the fire and enjoying it under the stars.

I did kind of change the recipe a bit, but nothing drastic. One thing that I changed was how to make the roux and add it to the soup. The original recipe had one adding soup to the roux and then pouring it back into the soup. I don't have time for that, nor do you need to do that if you are careful with adding the roux to the already cooking soup.

Well on with the recipe. Enjoy this soup on the upcoming cold days and nights ahead of us.
Tomato Basil Parmesan Soup


Tomato Basil Parmesan Soup
2-14.5 oz cans of diced tomatoes with juice
1 C finely diced celery
1 C finely diced carrots
1 T fresh oregano or 1 t dried
4 C chicken broth
1/2 C flour
1 C Parmesan cheese
1/4 t black pepper
1/4 C vegetable oil
1 C finely diced onions
4 T fresh basil or 1 T dried
1 bay leaf
1/2 C butter
2 C half and half
1 t salt

  1. Heat oil in 4 quart soup pot. Add celery, onions and carrots. Saute 5 minutes. Add basil, oregano, bay leaf, tomatoes, and 3 cups chicken broth. Bring it to a boil, reduce heat and simmer until carrots are tender, about 15 minutes.
  2. While soup simmers, prepare the roux. Melt butter over low heat, add flour and cook, stirring constantly, 5-7 minutes.  Slowly add 1 cup chicken broth the flour mixture. Add this mixture to the soup stirring it slowly into the soup mixture.
  3. Simmer, stirring constantly, until soup begins to thicken. Add Parmesan cheese and whisk to blend. Stir half and half, salt and pepper into the soup. Simmer over low heat 15-20 minutes, stirring occasionally.


Saturday, September 15, 2012

Banana Chocolate Chip Muffins

A pan of Banana Chocolate Chip Muffins

Just when I was going to be diligent about posting regularly I hit a snap foo! Yes I said a snap foo! Not that it was anything bad, but it took me a little off guard. You see I got, in my eyes, this amazing job offer from out of the blue. I am a teacher by trade and I have longed to be a classroom teacher. These past seven years I have been a reading specialist, teaching reading mainly in the primary grades. I have so wanted to have a change and teach a regular classroom and I guess this was the year for that change.

Well after a few days of talking back and forth I finally accepted this new position of 1/2 time reading support and 1/2 time kindergarten. It was sad to say goodbye to all my friends at my previous school, but I just couldn't pass up this great opportunity.

I am now working 1.3 miles from my home in a district that I have wanted to work in for years. I had worked for this district as a para before I got my teaching license so I already knew a ton of teachers within the district. It was like going home.

Well since I am kind of new to this whole kindergarten classroom teacher thing I've been a little busy. Especially since I started there in the middle of the week for teacher 's professional development week. I just now feel like I'm catching up a little. I still have some work to do this weekend, but at least my lessons are written, it's just a matter of some fine details.

So this morning I actually had time to bake some muffins. I made some Banana Chocolate Chip Muffins. They are so good. I hope you enjoy them.


Banana Chocolate Chip Muffins
1 large egg
1/3 C softened butter
3/4 C sugar
3 bananas mashed
1 t vanilla
1 C flour
1/2 C wheat flour
1 t baking powder
1t baking soda
1/2 t salt
1/2 C chocolate chips

Preheat oven to 350 degrees. Grease or line with muffin papers a 12 cup muffin pan.

In a large bowl combine egg, butter, sugar, and bananas. Mix well. Add vanilla. Set aside.

In a separate bowl combine the flours, baking powder, soda, and salt. Mix well.

Gradually add the flour mixture to the wet ingredients, mixing well. Add the chocolate chips and mix well.

Using an ice cream scoop, scoop the batter into the prepared muffin tins. The ice cream scoop will help you to get the right amount of batter in each muffin tin.

Bake the muffins for 15-20 or until golden brown.

Sunday, August 26, 2012

Grilled Veggie Sandwiches

Grilled Veggie Sandwiches

I'm baaaack!
I know I've been absent for awhile, but August is such a busy month for me with school starting up this month. If I'm not getting myself ready to teach this month I'm making sure my own kids have everything they need for college.

I have been back to work now for two weeks and it is amazing how tired I am. I just don't have any energy left at the end of the day to do any cooking or baking (sorry family).

Besides going back to work my kitchen has been in disarray. I finally got new counter tops and whenever you do some updating in the home it gets messy before it gets pretty. I had to take all my stuff out of the cabinets below the counters, so I didn't have to clean every item again. Then once the counters got put in I had to put stuff back. Of course I rearranged things and amazingly I like the new arrangement better.

Now all of this had to wait until I got back from my work retreat of camping out in the woods (this is a whole story in itself).

Anyways today I have this really yummy grilled veggie sandwich. I was kind of copying the sandwich from Snuffy's restaurant. Snuffy's is one of our favorite hamburger joints in St. Paul, MN. The last time we went there my daughter had a grilled veggie sandwich there and it looked amazing and she said it was really yummy. So I thought lets give it a try. 

Well the sandwiches turned out terrific and everyone loved them. They were quick and I would imagine half way nutritious. I think you could use whatever kind of veggies you have on hand to make this delicious sandwich too.

Grilled Veggie Sandwich
1 onion
1 green pepper
fresh mushrooms sliced
olive oil
swiss cheese or cheese of your choice
bread of your choice
butter

Slice onion, green pepper, and mushrooms. Heat some olive oil in a saute' pan. Saute' onion and peppers until onions are clear. Add mushrooms and saute' until done.
Preheat griddle or fry pan. Butter two slices of bread, placing one buttered side down put a spoonful of veggies on top, place a piece of cheese on top, place bread on top with buttered top up.
Grill first side until golden brown and flip over. Grill other side until golden brown and cheese is melted. 


Thursday, August 9, 2012

Tuna Tetrazzini

Wednesday was an extraordinarily cool day. So cool in fact that it got me tying a quilt that I've had sitting around since November. I don't know why I let it sit for so long, because tying a quilt goes rather quickly. I should be done tonight with tying it and be ready to bind it tomorrow.

With the temperature being so cool I was also in the mood for some comfort food. I'm really a pasta fan so I was trying to think of something with noodles in it, but had a creamy, yummy consistency.

I came up with this Tuna Tetrazzini purely by accident. I just happened to have fettucine noodles and some tuna, so I was trying to create something with these two items. What I ended up with was very good and super easy dish.

Give this one a try. I think you'll like it
Tuna Tetrazzini


Tuna Tetrazzini
1/3 C chopped onion
2 garlic cloves diced
1 T butter
1 can of cream of mushroom soup
1/3 C milk
1- 8oz can of mushrooms, drained
1 can of tuna, drained
1/2 box (12oz) of fettucine noodles
Parmesan cheese

Cook noodles per directions on box. In the meantime melt butter in sauce pan. Saute onion and garlic until onions are clear. Add soup, mushrooms and milk. Mix well. Add cooked noodles and heat through. Sprinkle Parmesan cheese on top.

Saturday, August 4, 2012

Bikini Cake

Last night I worked on a birthday cake for my brother. He just turned 52 and we are getting together on Sunday to celebrate. He has a brain injury so he lives in a care facility and we try to get together on his birthday every year. We usually do cake and ice cream and I am in charge of the cake this year.

 I wanted to do something fun for him.I was going to make something related to fishing, but then I had an epiphany! I can make a body with a bikini. What guy wouldn't like that for their birthday cake? Then I thought a body with a yellow polka dot bikini. You know the song, right?

So after working on this cake for a few hours this is my finished product. Don't be too harsh now, I'm new to cake decorating. I need to do some more practicing to perfect my skills, but I think my brother will get a laugh out of it.

Yellow Polka Dot Bikini
Sorry there is no recipe today. The cake is simply a sheet cake with two cup cakes for the top. I used Wilton's Decorating frosting recipe and colored it.

Thursday, August 2, 2012

French Vanilla Coffee Creamer

Well I don't know about the rest of you, but I like to have a cup of coffee or two to start my day. I always buy coffee beans, preferably Caribou coffee beans from Sams Club, and I need flavored creamer.

Even though I buy flavored creamer I also buy coffee syrup at Sams Club to add to my coffee. It just seems for my tastes the flavored creamers are usually lacking in full flavor for me. I don't know maybe my taste buds are jaded.

As we all know these flavored creamers can get a little expensive, so I found a recipe for making your own creamer. It is fairly inexpensive to make and tastes just as good as those premade creamers in the store.

All you need to make your own coffee creamer is sweetened condensed milk, milk or heavy cream, (I buy mine at Aldis) and coffee syrup. I used french vanilla flavor, but if you look at Sams Club you will find an assortment of flavors. My mind is already wandering to the different kinds of creamers that I could make. They have blue and red raspberry, coconut, chocolate, caramel, cherry lime, Irish cream, hazelnut and Kahlua. I probably missed a few too. And remember if you buy these syrups you don't just have to use them in your coffee they have other uses too. I use the raspberry in my lemonade to make raspberry lemonade. Super yummy!

Just mix these ingredients together in a old creamer container or in a mason jar and you've got your own homemade coffee creamer. So on those mornings when you run out of creamer you can quickly reach in the cupboard and make up your own.

Homemade Coffee Creamer
French Vanilla Coffee Creamer
14 oz sweetened Condensed milk
14 oz milk or heavy cream
4 t Vanilla Coffee Syrup
a container for mixing it in like a mason jar or old creamer container.

Pour all of the ingredients into your container. Put the cap or lid on tightly and shake vigorously for a few minutes until combined well. Refrigerate.

adapted from www.mrshappyhomemaker.com

Tuesday, July 31, 2012

Strawberry Rhubarb Pie

Strawberry Rhubarb Pies
Saturday morning my husband and I went to the Minneapolis Farmers Market. I love going there, but haven't gone in a couple of years. I usually end up at one of the smaller markets close to home and it's just not as much fun.  My husband had never been to the "Big" farmers market so it was a very fun and exciting adventure for the two of us.

Parking was the most challenging part for us, but after a few right turns we found a two hour meter spot. The funny thing about these meters is they are designated for the farmers market and you go pay at this centrally located box with your meter number. All computerized of course. Was kind of neat.


There is so much more than fruits and vegetables to buy at the farmers market. There is clothing, hats, handmade lawn decorations, meats, cheeses and all sorts of things. I ended up buying a beautiful scarf and my hubby almost bought this cool straw hat with a wide brim. Perfect for the boat. Maybe next time. I think my daughter would have loved all the beautiful dresses there too. I'm taking her next time.

Anyways, we had an awesome time. The first thing we saw when we got there was a little patio area with chimineas. They are those cute little clay fireplaces for patios. I want one for my front patio so bad. And to add to the fun atmosphere two guys were playing reggae music. It just got one in the shopping mode.

Well we decided to pass on the chimineas for now and went vegetable and fruit shopping. There are so many choices and we wanted to make sure we were getting a good deal that we walked around a bit first before we made that first purchase. There are just so many vendors to see that you can't go too far before you make a decision on purchasing something.

We ended up buying tomatoes, cucumbers, little fingerling potatoes, red peppers, blackberries, and rhubarb. I was surprised to see rhubarb there. I know it is supposed to be getting to the end of its season (so says the chart I have on when produce is in season), but I remember having it all summer long from my mom's garden as a kid. Only two stands had some so I just had to get some.

I ended up using  up just about everything we bought in a few days. I have enough potatoes and red peppers for one more meal. I also was able to cut up and freeze four cups of rhubarb for a future pie or rhubarb crisp.
Strawberry Rhubarb Pie

I used the other rhubarb, in combination with some strawberries I already had on hand, to make two pies. I used this Betty Crocker picture cookbook to make my pies. I have not made a pie crust in years and this was simple to do using this recipe. I did, however, roll the crust out between wax paper to make it easier to put in the pans (a trick I learned in home economics class). The crust turned out tender and flakey. The fruit filling was amazing! Give this one a try. I figure if my husband and son were going back for seconds it must be good.

Pastry for two-crust pies
for a 9" pie
2 C sifted flour
1 t salt
2/3 C shortening *
4 T water 
*When using hydrogenated shortings add about 2T more.
  1. Measure the flour into the mixing bowl and mix the salt through it.
  2. With pastry blender, cut in half the shortening finely...until mixture looks like meal. (This makes for tenderness)
  3. Cut in the remaining shortening coarsely...until particles are the size of giant peas. (This makes for flakiness).
  4. Sprinkle with the water, a tablespoon at a time...mixing lightly with fork until all the flour is moistened.
  5. Gather dough together with the fingers so it cleans the bowl.
  6. Press into a ball. Then roll out, or keep in waxed paper in refrigerator until needed. (I rolled it out between wax paper then peeled one sheet off and flipped it in the pie pan). Trim the dough around the edges of the pie pan.
  7. One crust goes in the pie pan. The second crust after peeling the one layer of wax paper off flip on top of your fruit filled pie. Use a spoon to make slits on top crust to vent pie. I did this once it was on top of the fruit, I find it easier to do it this way. You can do it before putting it on top if you like. Seal and flute edges. Form crimped fluting by pinching dough with thumb and forefinger around forefinger of opposite hand.

Strawberry-Rhubarb Pie filling
1 1/3 C sugar
6 T flour
2 C rhubarb, cut up
2 C strawberries, cut up
1 1/3 T butter
  1. Mix together the sugar and flour.
  2. Add the rhubarb and strawberries and mix lightly.
  3. Pour into pastry-lined pie pan.
  4. Dot with butter.
  5. Cover with top crust. Sprinkle with sugar. (Don't forget to vent top crust.)
  6. Bake at 425 for 40-50 minutes or until crust is nicely browned and juice begins to bubble through slits. Serve slightly warm.
Recipe from Betty Crocker's Picture Cook Book

Sunday, July 29, 2012

Stuffed Green Peppers

Stuffed Green Peppers
It's that wonderful time of summer when all the fresh produce is coming in by the bushel full. I am anticipating going to the Farmers Market, which I have yet to do this summer. Now is the time because I just heard on the local talk show that produce is at its peak right now. You can pretty much get what ever you want at the Farmers Market.

My garden this year is another story. It actually is a very sad and pathetic garden this year.  It just isn't doing that great, but I have produce from my mother. Her garden always does great! I'm a little jealous, especially since I was so ready this year to tend to my garden. About the only two things that are doing great are the beans and cucumbers. Well at least I can get produce from my mom.

My mom gave me five green peppers this week and I just had to make stuffed peppers with them. They are so easy to make and so delicious. They also are real easy to reheat at a later date if necessary. Everyone at my house is on a different work schedule so most of the time someone is reheating dinner later or the next day.

These work best if you have some nice sized peppers that will stand up well on their own. Although I have been know to use a few smaller peppers just so I can make this dish. Whatever you choose to do enjoy this yummy dish of stuffed green peppers.

Stuffed Green Peppers
6 large green peppers
5 Cups boiling water
1-lb ground beef
1 C cooked rice
2 T chopped onion
1 t salt
1/8 t garlic powder
1- 15oz can tomato sauce*
mozzarella cheese

Heat oven to 350. Cut thin slice from stem end. Remove insides and wash. Cook in boiling water for 5 minutes. Drain. Cook hamburger and onion until onion is tender. Drain fat. Stir in salt, garlic powder, rice and 1 cup of tomato sauce; heat and lightly stuff each pepper with 1/2 c meat mixture. Stand peppers in a greased pan. Pour remaining sauce over peppers. Cover and bake 15minutes. Top with cheese and return to oven to slightly melt.

Recipe from my sister-in-law Cindy.

*note: you can also use spaghetti sauce in a jar. I have done this before and it is very good this way too.

Friday, July 27, 2012

Banana Nut Waffles

Banana Nut Waffles

Well it's been awhile since I've posted a recipe. I've just had quite a week with so much happening around here that I just didn't take the time to sit down and type up my current recipes.

First my laptop got a virus while I was on Pinterest. So be careful when you are looking at people's pins. Luckily I shut my laptop down immediately and it saved it from getting too bad and the Geek Squad didn't have to work on it for too many days. Those guys are great by the way. They fixed my laptop and got it working great.

My new SD card for my camera was bad and I couldn't get any of the pictures on it to transfer to my computer. Said it was corrupt! Of course I couldn't find my receipt to return the card so I lost out on that deal. I'll never buy a Dane-Elec product again. Now I need to get a new SD card for my camera. Luckily I now have my pictures on my phone synced up with my computer so that helps. Still want an 8GB card for my camera. I still like using my camera for pictures.

Then this weekend my husband and I drove from Minneapolis to Eau Claire to look at and of course buy a Coleman tent trailer. That was a two hour drive and then about an hour looking at it before we were back on the road with trailer in tow for another two hour drive home. This of course meant we, (or should I say "I") had to clean it up and get it packed up with our camping stuff so we can be ready to go on a moments notice.

I also had a ton of other little things come up throughout the week that I needed to attend to which kept me busy, but now I'm back and ready to get things up and going again.

I made these waffles this past Sunday. Usually on Sundays we have a big breakfast with bacon, eggs and either pancakes, waffles or french toast. I decided to make these Banana Nut Waffles because of course I had some sad looking bananas that needed to be used and I just hate throwing them away.

The recipe came with my waffle maker and has been a hit with my family for a long time. Because I had two bananas I doubled the recipe. The left over waffles I just put in a ziploc bag and the kids heat them up in the microwave for breakfast throughout the week. I have also frozen them and microwaved them individually as needed.

Waffles with a little syrup
Banana Nut Waffles
1/2 C whole wheat flour
1/2 C all purpose flour
1 t baking powder
1/4 t salt
3/4 C milk
1 banana
1 egg, separated
1 T vegetable oil
1/4 C walnuts, chopped

  • Sift dry ingredients together in a bowl.
  • Add egg yolk, milk and vegetable oil to the dry ingredients and beat together thoroughly.
  • Mash banana and beat banana and nuts into batter.
  • Beat egg white until stiff, stir 1/4 into the batter to lighten it and then gently fold in the remaining egg white.
  • Pour a scant 1/3 cup of batter onto the heated waffle mold.
  • Makes 6 waffles. Serve with butter and syrup.

Tuesday, July 17, 2012

Banana Whoopie Pies

Banana Whoopie Pies

Well it happened again. I had three bananas go bad on me. I'm the only one at my house that eats bananas, so it's really hard to not have a few go bad. But I'm getting really tired of making banana bread or banana bars and wanted something a little different.

So after searching the internet I came upon a couple recipes for Banana Whoopie Pies. Now I've never made Whoopie Pies before and I wasn't really sure what they would taste like or how they would bake up, but I thought I'd give it a whirl.

I decide to go with the recipe from Taste of Home. I liked the idea that the filling had peanut butter in it and I like peanut butter. The recipe also sound very simple. I did add a teaspoon of cinnamon to the cookie part to spice up the banana part. It was a good choice.

The one suggestion that I would make is to make the cookie part smaller than what they suggest. The recipe says drop by tablespoonfuls, which I did and it made huge cookies. I would make them half the size because they are quite sweet to have such a large whoopie pie.

So I hope you enjoy the recipe.

Banana Whoopie Pies
1/2 C butter, softened
3/4 C sugar
1/4 C brown sugar
1 egg
1 t vanilla extract
1/2 C mashed ripe banana
1/2 C milk
2 C all purpose flour
1/2 t salt
1/2 t baking powder
1/2 t baking soda
1 t cinnamon

Filling:
1 pkg (8 ounces) cream cheese, softened
1 C creamy peanut butter
3 T butter, softened
1 C confectioners' sugar
1 t vanilla extract

Directions
  1. In a large bowl cream butter and sugars until fluffy. Beat in egg and vanilla. In a small bowl mash a banana to measure 1/2 C. Add to sugars along with the milk and mix well. Combine flour, salt, baking powder, and baking soda in a separate bowl. Gradually add to the creamed mixture and mix well.
  2. Drop by 1/2 Tablespoonfuls about 2 inches apart (they will spread) onto parchment paper-lined baking sheets. Bake at 350 for 12-15 minutes or until set. Cool for 2 minutes before removing from pans to wire racks to cool completely.
  3. For filling, in a large bowl, beat the cream cheese, peanut butter, and butter until fluffy. Beat in confectioners' sugar and vanilla until smooth. Spread filling on the bottoms of half of the cookies and top with the remaining cookies. Store in the refrigerator.  Makes 2 dozen. 

Wednesday, July 11, 2012

Chocolate Chip Cookie Dough Brownies

Chocolate Chip Cookie Dough Brownies

The past five days have been very busy for me and my family. My brother and is daughter were in town from Utah for his oldest daughters wedding. We have been anticipating the big event for some time now and we were all so excited to be together again for some fun family time.

The wedding ceremony and the celebration that followed was extraordinary! Everything went relatively smooth with maybe a few bumps, but nothing that was not fixable. Fun was had by everyone that participated and/or attended the festivities.

Yesterday the newly married couple went off on their mini-moon and my brother and his younger daughter flew back to Utah in the early afternoon. I guess it is back to reality for all of us now, but we sure had a good time these last five days.

So now I'm trying to get back to doing some more blogging now that things have settled down. Today I was so wanting something sweet and I started looking through some recipes that I've been wanting to try and I came across this brownie recipe. This is not your usual brownie though. This has cookie dough on top of the brownie. Just look at that picture it looks so darn good.

I found this recipe on The Brown Eyed Baker's blog. I made a little change to the recipe and they taste amazing. Give this one a try. They are easy and irresistible. Enjoy!


Chocolate Chip Cookie Dough Brownies
Brownie part
4 ozs. unsweetened chocolate 
1 C butter, softened to room temperature
2 C brown sugar
4 eggs
2 t vanilla extract
1 C all-purpose flour

Preparing the brownies
Preheat the oven to 325. Liine a 9x13 pan with foil, hanging the foil over all four sides. Spray the foil with cooking spray and set aside.   
Melt the chocolate in the microwave using 30 second increments, stirring after each time. Once it is melted set it aside.
In a large bowl mix the butter and the sugar with an electric mixer until fluffy. Add the eggs and vanilla and mix with mixer until well blended. Add the melted chocolate and combine well. Reduce the speed to low and add the flour and mix until combined.
Spread the batter into the prepared pan and bake for 25-35 minutes or until a toothpick inserted in teh center comes out clean. Let brownies cool completely.

Cookie Dough part
3/4 C butter, softened to room temperature
3/4 C brown sugar
3/4 C sugar
3 T milk
1 1/2 t vanilla extract
1 1/2 C flour
1 1/2 C semi-sweet chocolate chips

Preparing the Cookie Dough
In a medium bowl combine the butter, brown sugar, and sugar and mix with and electric mixer on medium speed. Add the milk and vanilla and combine well. Reduce the speed to low and add the flour until combined. Using a rubber spatula stir in the chocolate chips.

Spread the cookie dough over the cooled brownies. Refrigerate for one hour or until the dough is firm. Remove the brownies from the pan by lifting the foil up. Cut the brownies into squares and store in an airtight container in the refrigerator.
Makes approximately 32 brownies.  

Thursday, July 5, 2012

Better Than Anything Cake

It has been a rough week of high temperatures and high humidity here in Minnesota. It actually feels like Florida minus the palm trees. Thank goodness for air!

Because of the heat I have not been doing any baking or cooking for that matter, until of course yesterday. I needed to make a dessert for the fourth because I was having company over that evening. I was at first going to make jello cake, but I came across this recipe and it sounded so darn good that I had to give it a try.

Better Than Anything Cake


I found the recipe on http://www.chef-in-training.com/2012/06/better-than-anything-cake/ . The picture of the cake was just mouth watering that I had to go ahead and try and make this. I also like how easy the recipe was and heck I just happen to have everything I needed to make this.

This cake was easy to make and about the only thing that I would change or do different is I think I could get away with using 2 Heath bars. I just put my candy bars in my little Cooks food processor and it crushed the candy bars up nicely. I also think that maybe Snickers would be another good candy bar to use on this.

Well here's the recipe and enjoy!

Better Than Anything Cake
1 box chocolate cake mix and any ingredients it requires
1 (14oz) can sweetened condensed milk
1 (8oz) jar caramel topping
1 (8oz) container cool whip thawed to room temperature
3 Heath Candy Bars chopped

Directions
  1. Bake cake according to directions in a 9 X 13 pan.
  2. Let Cake cool for about 5 minutes.
  3. Poke holes in cake with the handle end of a wooden spoon.
  4. While cake is still warm, slowly pour over sweetened condensed milk over the top making sure some gets in all the holes of the cake.
  5. Next drizzle the caramel topping evenly over the cake slowly, making sure some gets in all the holes as well.
  6. Spread cool whip over the top evenly.
  7. Sprinkle with Heath Candy bar pieces.
  8. Store in fridge until ready to eat. Store any leftovers in fridge.

Wednesday, June 27, 2012

Malibu Sunrise

Malibu Sunrise

Well today is going to be record high temperatures for Minnesota. The temperature is suppose to get to 97 and we have a heat warning out for the afternoon. Sounds like it is going to be a day/night for air conditioning or lounging in the pool or lake.

It also is a perfect time to enjoy a beverage or two outside, under an umbrella of course, and I have the perfect drink for such occasion. The Malibu Sunrise. It is a very refreshing drink and you can adjust the amount of alcohol you would like in it to suit your tastes.

The ingredients are simple. You need orange juice, ice, Malibu rum, and grenadine. I could sip on these all day long. Malibu rum is coconut flavored and it really makes this drink. So go pick up these couple of ingredients and make yourself one tonight and enjoy.

Malibu Sunrise
Orange Juice
Malibu Rum
Grenadine syrup
Ice

Put some ice in a tall glass. Add a shot or two of Malibu Rum. Add orange juice. Drizzle grenadine syrup on top for color. Mix with a swizzle stick and enjoy!

Saturday, June 23, 2012

Lemon Bundt Cake

So this week I was craving lemon cake. I didn't want to just grab a lemon cake mix and whip it up I wanted something different. I wanted a bundt cake. O.K. go ahead and make the bundt cake jokes like from My Big Fat Greek Wedding like my son and I did.(I love that movie. I never get tired of it.) Anyways, so I started to look for a recipe that was quick and easy, but that I could still make my bundt cake.

I finally found one on cooks.com. It was easy and I had all the necessary ingredients. I did, however adjust the baking time for the cake. The recipe said to bake for 1 hour and my cake was done in 40 minutes, so keep an eye on your cake when baking so you can adjust your time if needed.

I want to give you a word of warning for greasing the bundt pan. I used just a cooking spray and I thought I sprayed the heck out of the pan, but not so. My cake stuck on one side and I kind of had to piece it back together before I glazed it. I think I have to stick with what my mother says and that is to brush with shortening and then lightly flour. I never have problems with my cakes sticking when I do it the old fashion way, but you decide.

Ignore my ugly red platter. Couldn't find my glass cake plate.


I also did not make the glaze that they suggested. Instead I just did a powdered sugar glaze with some lemon extract in it for flavor. You can decide which one you prefer.

I think this cake is just perfect for a summer dessert. It is really light and has that fresh lemon taste that it will make you want another slice.

Lemon Bundt Cake
1pkg yellow cake mix
1 small pkg lemon jello
3/4 C water
2 t lemon extract
1/2 C oil
4 eggs

Powdered Sugar Icing
1 C powdered sugar
1t lemon extract
Milk


Mix all ingredients. Beat well. Pour into greased and floured bundt cake pan. Bake 1 hour at 350 degrees. Cool cake in pan on a cooling rack. Once it is cool invert onto a cake plate. Prepare icing. Mix powdered sugar and lemon extract together in a small bowl. Add a little milk at a time to make a semi thick frosting. Don't worry if you add too much milk just add some more frosting. Drizzle icing over cake once cake has cooled.


Glaze
3/4 C powdered sugar
Juice from 1 lemon

Prepare lemon juice with sifted powdered sugar. Pour over cake when it comes out of the oven. 

Tuesday, June 19, 2012

Peanut Butter Chocolate Chip Muffins

Peanut Butter Chocolate Chip Muffins

Well I know that on Facebook I promised to post this recipe last week, but life kind of got in the way. I had very good intentions of posting the recipe asap, it's just that I have been a little under the weather. I've got this terrible cold and congestion thing going on that took the fight out of me for a few days.

I'm just now starting to feel a little better and not needing to take a nap and then also feeling like I need to go to bed early. I did not know that I could sleep so much. Those days have been long since gone when I could sleep forever.

Well I'm back and I'm feeling good (except for the little cough thing I've got going on) and I'm ready to post that muffin recipe.

So I found this recipe via Pinterest. It linked me to The Curvy Carrot blog. Who got the recipe from Taste of Home, but tweaked it a little. Then I took the recipe and tweaked some more.

The bottom line is I added one little ingredient to add a little bit more flavor and it ended up being a real hit at my house. I simply added peanut butter and it gave it a bit extra to make them want to gobble them up. In fact they were gone by the next day.

Even Bella wanted a taste.


Here's the recipe. I hope you enjoy them!

Peanut Butter Chocolate Chip Muffins
Servings: 12 muffins
Ingredients
1 and 1/2 cups all-purpose flour
2/3 cup granulated sugar
3/4 teaspoon baking powder
3/4 teaspoon baking soda
1/4 teaspoon salt
1 large egg
1 cup sour cream
1/2 cup creamy peanut butter
5 tablespoons unsalted butter, melted
1 teaspoon vanilla extract
1 cup semi-sweet chocolate chips

Directions
1.  Preheat the oven to 350 degrees.
2.  Line one cupcake pan with liners, set aside.
3. In a large bowl, mix together the flour, sugar, baking powder, baking soda, and salt.
4.  In another large bowl, combine the egg, sour cream, peanut butter, melted butter, and vanilla extract, mixing well.
5.  Add the wet ingredients to the dry ingredients and stir with a rubber spatula until just combined.
6. Gently add in the chocolate chips until thoroughly combined.
7. Evenly divide the batter among the prepared cupcake liners (I use a large ice cream scoop for this) so that the liners are about 3/4-full.
8.  Bake until a tester inserted into the center of the muffins comes out clean, about 20 minutes.

Tuesday, June 12, 2012

Slider Mini Burgers

Slider Mini Burger

How many of you have gone out to eat at one of those family friendly bar/restaurants and just loved the idea of a mini hamburger or better known to most of us as a slider? For some reason having a mini burger sounds really appealing. The name even sounds appealing. "Slider." Now no place else but in a bar/restaurant would this word sound like something edible, but it is. Despite the name we all have come to know these little burgers to be delicious and ever so cute to eat.

Now I decide today to kind of make my own version of sliders at home. It really isn't all that hard to do and these little burgers grill up in no time at all. Most of the ingredients are things I would think most people have on hand. As for the buns I used the Hawaiian Sweet rolls, but you could use some little dinner rolls and they would work just as well. The Hawaiian rolls, though, were the perfect size for the sliders. I top the little burgers off with some pepper jack cheese, but I think you could use whatever kind of cheese you like or have on hand.

So be adventurous and make your own Slider Mini Burger. The skies the limit.

Slider Mini Burgers
1lb of burger
1/2 C of bread crumbs
1 egg
1 T powdered ranch dressing
1-2 t Worcestershire sauce
1 T red pepper flakes
1 garlic clove, minced
1/4 C chopped red onion
slices of cheese
Hawaiian rolls

In a bowl mix burger, bread crumbs and egg until well combined. Add ranch dressing, Worcestershire sauce, red pepper flakes, garlic and red onion. Mix Well. Shape meat mixture into 9 mini burgers and grill. Add a small slice of cheese to top of burger. Close lid of grill and let cheese melt. Serve on mini buns with ketchup and mustard.


Monday, June 4, 2012

Peanut Butter Chocolate Chip Cookies

Peanut Butter Chocolate Chip Cookies

OK, so today I'm not having the best day and it's looking like my week is not going to really get much better. One way I know to make it a little more bearable is to bake something. That something is preferably chocolate. Actually peanut butter and chocolate.

I found just the cure for my blues, Peanut Butter Chocolate Chip Cookies!

The recipe is basically a peanut butter cookie recipe with chocolate chips added. You can use either chunky peanut butter or creamy peanut butter. I used creamy because that is what I had on hand, but I sure bet it would be great with chunky. Maybe next time.

Well I might not be good at much, but at least I'm good at baking! I can pretty much bake just about anything and it'll turn out pretty darn good.


In my dreams I imagine what it would be like to have my own tiny, little small town bakery. It would of course have a few staple specialty items, but on occasion have a few seasonal type items. A place where one could get a sweet little treat and a cup of coffee or a glass of milk. After all what would cookies be without the milk? Still working on that dream though. A girl can dream can't she?

Peanut Butter Chocolate Chip Cookies

1C butter, softened (2 sticks)
1 C chunky or creamy peanut butter
1 C sugar
1 C brown sugar
2 eggs
2 1/2 C flour
1 t baking powder
1 t baking soda
1/2 t salt
2 C semi sweet chocolate chips

Preheat oven to 375.
Cream butter, peanut butter and sugars until light. Add the eggs and mix until fluffy.
Blend the flour, baking powder, soda and salt together well. Add these dry ingredients to the butter mixture. Add the chocolate chips.
Drop cookie dough by teaspoonfuls onto lightly gteased baking sheets. Bake for 10-12 minutes at 375.
Makes 6 dozen. 


Thursday, May 31, 2012

Hmong Eggrolls


Well if you checked out my facebook page at all you've seen the pictures from my Monday night PLC (Professional Learning Community) meeting at work. The whole elementary got together and learned the art of making authentic Hmong eggrolls. We all had a great time learning how to make eggrolls and wished we would have done it sooner.We all kept saying "Why did we wait til the end of the year to do this?"


We had several patient and talented teachers that taught us the art of making these delicious eggrolls. So I want to start by thanking them all for helping us learn how to make this yummy treat . Thank you Mia, Mor Chia, Crystal, Nou, Pa, and Pakou.


I also especially want to thank Sam for organizing this activity. She did an amazing job! Not only did we learn how to make eggrolls we all brought a recipe to share and we had an apron contest. Our winner for the apron contest was Jenna. She was over come with joy (notice the tears) tee hee!

Jenna being crowned by Sam for the best apron.
On that night we made like 300 eggrolls. We needed to cut the recipe down to a more manageable size and Mia was kind enough to write down the recipe for me to share with all of you. I hope you enjoy making these as much as we all did. Happy egg-rolling!

  Egg Roll
1lb. ground pork or beef
1/2 chopped cabbage
3 chopped green onions
1 bunch of cilantro chopped, if desired
4 shredded carrots or 1/2 bag
2 T Hoisen sauce
2-3 T soy sauce
1/4 box Vermicillian Noodles (look for pink bag at Oriental foods store or buy other thin rice noodles in oriental foods dept.)
fish sauce
25 pkg. bag of egg roll wrappers

  1. 1-2 hours prior.Pre-soak noodles in hot water and put aside.
  2. Chop 1/2 head of cabbage, 3 green onions, shred carrots. Option: use coleslaw mix and green onions.
  3. In a large mixing bowl combine the cabbage, onions, carrots, the noodles cut intosmall pieces, soy sauce, Hoisen sauce and fish sauce. Ground pork should be pre-prepared for the filling by pan-frying until nearly cooked, not completely. Then add to the filling mix. Mix all of the ingredients together well.
  4. Add 3 whole eggs and 2 egg whites (keep the yolks to use as glue). Mix all lf the ingredients together. (Note: you do not have to separate egg whites)
  5. Open the bag of egg roll wraps and place one at a time on the counter or on a plate in front of you so it is in a diamond position. Take 2 tablespoons of meat/vegetable mixture and place it on one of the corners of the wrap.Gently fold over the wrap forward. Fold over both edges of wrap into the center. Roll it until you only have a small corner left then dip your finger in the egg yolk and place a small amount on the final tip of the wrap and seal the roll shut. 
  6. Continue this same procedure until all mix or wraps are used up. At some point drain the mixture of excess liquid to prevent your eggrolls from being soggy or tearing.
  7. Place 1 inch of oil in a large skillet and heat at medium heat on the stove. Carefully place eggrolls in the hot oil and cook for 15 minutes (remember to flip several times while cooking. Egg rolls should be a golden brown in color. Remove carefully with a tong or spatula and place on a plate lined with paper towels. You'll know it's ready by testing with a slight tap on the shell to determine if it is hardened.
  8. They are now ready to eat as soon as they cool down for a few minutes. Uncooked eggrolls can be stored in the freezer until you are ready to make them.

Note: Eggroll wrapper pack needs to be set out so it can thaw. It's best to not thoroughly thaw out the wrappers. Thaw only enough so you can peel  then without tearing, because they are delicate.


All hands were on deck for the rolling of the eggrolls. If you want to see more pictures from this night go to my facebook page and check them out.

Also if you haven't liked my facebook page yet please do and tell a friend about my page and blog. Thanks for visiting.

Saturday, May 26, 2012

Mini Pretzel Ice Cream Sandwiches


With Memorial Weekend comes family get togethers and picnics. And traditionally these get togethers and picnics are all about grilling, summer salads and cold beverages. Of course we can't forget the dessert. It just has to be Ice Cream!

You can do ice cream in a variety of ways to please every age group. You can just simply buy an exotic flavor at the grocery store. You can get creative and make your own homemade ice cream, which is a lot of fun (see prior post for ice cream). You can also make ice cream sandwiches.

Now ice cream sandwiches can be as simple as getting cookies from the bakery and scooping some of your favorite ice cream and smooshing it in between two cookie. Some might even try making homemade ice cream sandwiches with the chocolate wafer (still want to try that). Or you could do what I did. Make mini pretzel ice cream sandwiches.

Now with these little ice cream sandwiches everybody can at least have a little taste. They are so small that if for some reason you're dieting or watching your weight you won't feel so awful if you just have one.

I kind of got the idea from my Simple and Delicious magazine. They had all these different ice cream sandwiches in it and I decided to try and make something that would be just as easy and taste just as great. Now that doesn't mean I'm not going to try some of those awesome recipes for ice cream sandwiches, because I am. I was just home alone last night and started messing around in the kitchen with what I had on hand.

I really think this treat could be easily made with children and I even think that the edges could be rolled or dipped into sprinkles to make them look even yummier. I just am low on sprinkles right now. I simple used the knot style pretzels, Wilton's chocolate candy melts and some vanilla ice cream (my chocolate chip ice cream mysteriously disappeared), but you can use any flavor ice cream. It doesn't take long for the chocolate to harden after dipping so these can be made asap.

So here's the recipe. Give them a try and let me know if you have any suggestions. Happy Memorial Day!
Tools I used to make them.


Mini Pretzel Ice Cream Sandwiches
60 -70 pretzels
1 bag of Wilton's chocolate candy melts
ice cream of your choice
  1. Melt the candy melts in the microwave according to package directions.
  2. Lay out a couple of sheets of wax paper or parchment paper.
  3. Dip one side of pretzel into chocolate. Remove and place chocolate side up on paper. (I used a plastic fork with the middle tines removed to take pretzels out). Let the chocolate harden.
  4. Take ice cream out of freezer and let it soften a little to make it easier to scoop and squish between the pretzels. Once it is softened use a small scoop and scoop out a ball of ice cream. Place on the uncoated pretzel side. Place another pretzel on top with chocolate side up. Squeeze gently together. Place on a cookie sheet to place in freezer to set up. Once they have set up place in a sealed container.

Wednesday, May 23, 2012

Confetti Cookies

I just had to share a new found recipe for a soft, moist cookie. My daughter and I just really had a sweet tooth and we wanted something that was quick to make to satisfy our craving for something sweet. I also wanted something that was not too labor intense so I could whip it up without a lot of trouble and kick back on the couch and continue watching the Bachelorette.

I started looking around on some cooking blogs that I had bookmarked and I found this very interesting recipe for a cookie using a cake mix. The cookie had red and blue sprinkles in it and I had sprinkles (just a little different color).  I liked the picture of the cookie in the blog so I thought what the heck, I'll give it a try. I changed the recipe a little by not adding as much sprinkles to the mix and I used rainbow sprinkles.

Good thing I always keep a few cake mixes on hand for those times when you need a quick dessert. I usually have one white mix, one yellow mix, and one chocolate mix in the cupboard. I also keep a couple of brownie mixes and a can or two of frosting.

The bad thing about this recipe is it only makes 30 cookies. Once you make these you'll just want to eat and eat and eat these cookies. They remind me of that Funfetti cake and frosting that you can buy. Make sure you have a glass of milk ready when you sit down. You're going to need it. Enjoy!

Confetti Cookies

 
Confetti Cookies
  
1 box french vanilla cake mix, 18.25 oz*
1 tsp baking powder
2 eggs
1/2 C vegetable oil
1/2 tsp vanilla extract
1/2 C rainbow sprinkles

Preheat oven to 350 degrees. In a large bowl, mix together the cake mix and baking powder. In a small bowl, mix together the eggs, oil and vanilla. Add the egg mixture to the cake mixture and stir to combine. Stir in the sprinkles. Drop by spoonfuls onto a cookie sheet.
Bake for 10 minutes. Allow to cool for 5 minutes on the baking sheet before transferring to cooling rack. The cookies will be very soft at first. Cool and enjoy! makes 30-32 cookies
 adapted from my funfetti cake batter cookies
   http://cookincowgirl.blogspot.com/